How to Diagnose Suspension Noise: A Troubleshooting Guide
Suspension noises can indicate underlying problems. Learn how to diagnose suspension noise and identify potential issues. Prevent further damage and ensure your vehicle's safety. Troubleshoot common suspension problems with our helpful guide.
Identifying Common Suspension Noises Suspension Troubleshooting
Alright, so you're cruising down the road, or maybe tackling some gnarly trails, and suddenly you hear a noise coming from your suspension. It's not always easy to pinpoint, but understanding the different sounds can help you narrow down the problem. Let's break down some common culprits:
- Clunking: This is often a sign of something loose or worn out. Think ball joints, tie rod ends, sway bar links, or even a worn shock absorber bushing.
- Squeaking: Squeaks usually indicate friction between two parts that should be lubricated. Bushings, ball joints, or even a dry shock absorber shaft can cause this.
- Rattling: Rattling sounds can be tricky, but they often point to loose hardware or worn-out components like sway bar links or shock absorbers.
- Popping: A popping sound, especially when turning, could indicate a bad CV joint (constant velocity joint) on your front axle.
- Groaning: Groaning noises are often associated with worn-out bushings or ball joints, especially when the suspension is articulating.
Tools You'll Need for Suspension Noise Diagnosis DIY Guide
Before you start poking around, gather some essential tools. Having the right equipment makes the process much easier and safer:
- Jack and Jack Stands: Safety first! Always use jack stands to support the vehicle when it's raised.
- Wheel Chocks: To prevent rolling, chock the wheels opposite the ones you're working on.
- Wrench Set (Metric and/or SAE): You'll need a variety of wrenches to loosen and tighten bolts and nuts.
- Socket Set (Metric and/or SAE): Sockets are essential for accessing fasteners in tight spaces.
- Torque Wrench: Properly torquing fasteners is crucial for safety and preventing future problems.
- Pry Bar: A pry bar can help you inspect ball joints and other suspension components for play.
- Grease Gun: For lubricating greaseable fittings (if applicable).
- Penetrating Oil: To help loosen stubborn bolts and nuts. PB Blaster or similar works great.
- Flashlight or Headlamp: Essential for seeing into dark areas under the vehicle.
- Safety Glasses: Protect your eyes from debris.
- Gloves: Protect your hands.
Step-by-Step Suspension Noise Troubleshooting Process Off-Road Vehicle
Now, let's get down to business. Here's a systematic approach to diagnosing suspension noise:
- Visual Inspection: Start with a thorough visual inspection. Look for obvious signs of damage, wear, or looseness. Check for torn bushings, leaking shocks, bent components, and loose hardware. Pay close attention to ball joints, tie rod ends, sway bar links, and shock absorbers.
- Bounce Test: Push down firmly on each corner of the vehicle and release. The vehicle should bounce up and settle quickly. Excessive bouncing indicates worn shocks or struts. Listen for any unusual noises during the bounce test.
- Sway Bar Link Check: Sway bar links are common sources of noise. Grab each link and try to wiggle it. Excessive play or clunking indicates a worn link. You can also try disconnecting one end of the link and driving the vehicle briefly to see if the noise disappears. (Be careful when driving with a disconnected sway bar link, as it will affect handling).
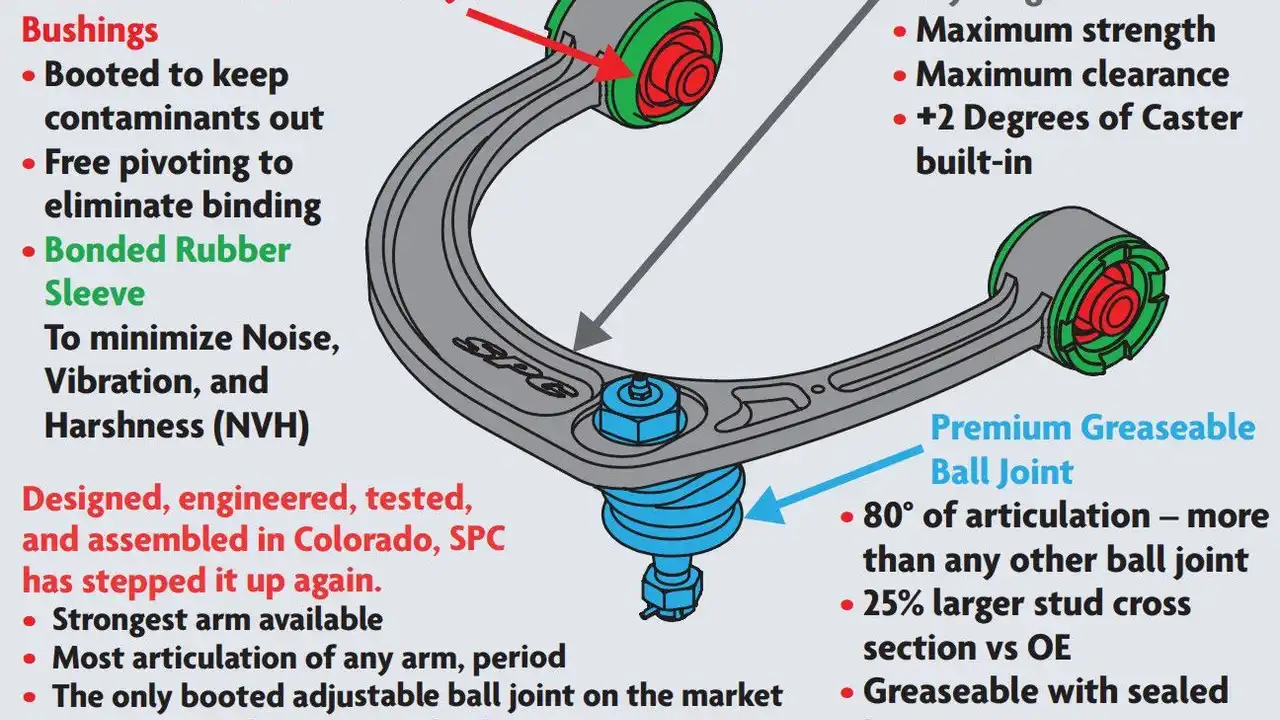
- Ball Joint Inspection: Ball joints are critical for steering and suspension. To check them, lift the vehicle and securely support it with jack stands. Grasp the tire at the 12 and 6 o'clock positions and try to rock it back and forth. Excessive play indicates a worn ball joint. You can also use a pry bar to check for movement between the ball joint and the control arm.
- Tie Rod End Inspection: Tie rod ends connect the steering linkage to the wheels. Check them similarly to ball joints. Grasp the tire at the 3 and 9 o'clock positions and try to rock it back and forth. Excessive play indicates a worn tie rod end.
- Shock Absorber Inspection: Look for signs of leakage around the shock absorber body. Also, check the bushings at the top and bottom of the shock for wear or damage. If the shock is leaking or the bushings are worn, it needs to be replaced.
- Control Arm Bushing Inspection: Control arm bushings connect the control arms to the vehicle's frame. Check them for cracks, tears, or excessive wear. You can use a pry bar to check for movement between the control arm and the frame.
- CV Joint Inspection (If Applicable): If you hear a popping sound when turning, especially at low speeds, the CV joints may be the culprit. Look for torn or damaged CV boots. If the boot is torn, grease can leak out, leading to premature wear and failure of the joint.
- Listen While Driving: Have a friend drive the vehicle while you listen carefully for the noise. Try to identify when the noise occurs (e.g., when hitting bumps, turning, accelerating, or braking). This can help you pinpoint the source of the problem.
Specific Product Recommendations for Suspension Repairs Price Points
Okay, so you've diagnosed the problem. Now what? Here are some product recommendations based on common issues, with price ranges to give you an idea of what to expect:
Sway Bar Links
- Moog Sway Bar Links: Moog is a reputable brand known for quality and durability. Their sway bar links are a good choice for replacing worn-out factory links. Price: $20-$50 per link
- Energy Suspension Sway Bar Bushings: If your sway bar links are still in good shape, but the bushings are worn, consider replacing them with polyurethane bushings from Energy Suspension. Polyurethane bushings are more durable than rubber bushings and can improve handling. Price: $10-$30 per bushing kit
Ball Joints
- Moog Ball Joints: Again, Moog is a solid choice for ball joints. They offer a variety of ball joints for different vehicles and applications. Price: $30-$100 per ball joint
- Dana Spicer Ball Joints: If you have a Jeep or other vehicle with a Dana axle, consider using Dana Spicer ball joints. They are designed specifically for Dana axles and offer excellent performance and durability. Price: $50-$150 per ball joint
Shock Absorbers
- Bilstein 5100 Series Shocks: Bilstein 5100 series shocks are a popular upgrade for off-road vehicles. They offer improved handling and ride quality compared to factory shocks. Price: $100-$200 per shock
- Fox 2.0 Performance Series Shocks: Fox 2.0 performance series shocks are another excellent option for off-road vehicles. They offer similar performance to Bilstein 5100 series shocks but may be slightly more expensive. Price: $150-$250 per shock
Control Arm Bushings
- Energy Suspension Control Arm Bushings: Like with sway bar bushings, Energy Suspension offers polyurethane control arm bushings that are more durable than rubber bushings. Price: $20-$50 per bushing kit
- Moog Control Arm Bushings: Moog also offers control arm bushings, which are a good option if you prefer rubber bushings. Price: $15-$40 per bushing
Comparing Suspension Component Brands Performance and Durability
When choosing suspension components, it's important to consider the brand. Some brands are known for their performance, while others are known for their durability. Here's a quick comparison of some popular brands:
- Moog: Known for quality, durability, and a wide range of applications. A reliable choice for most vehicles.
- Energy Suspension: Specializes in polyurethane bushings, which offer improved durability and handling compared to rubber bushings.
- Bilstein: Known for high-performance shocks and struts. A popular choice for off-road vehicles.
- Fox: Another popular brand for high-performance shocks and struts. Offers a wide range of products for different applications.
- Dana Spicer: Specializes in drivetrain components, including axles, ball joints, and u-joints. A good choice for vehicles with Dana axles.
- Warn: Primarily known for winches, but also manufactures some suspension components like springs and shackles.
DIY Repair vs Professional Mechanic Pros and Cons
Once you've identified the problem and gathered the necessary parts, you need to decide whether to tackle the repair yourself or take it to a professional mechanic.
DIY Repair: * Pros: * Save money on labor costs. * Learn about your vehicle. * Sense of accomplishment. * Cons: * Requires time and effort. * Requires tools and equipment. * Potential for mistakes. * Can be dangerous if not done properly. Professional Mechanic: * Pros: * Experienced and knowledgeable. * Have the right tools and equipment. * Can diagnose and repair problems quickly and efficiently. * Offer a warranty on their work. * Cons: * More expensive than DIY repair. * May not be able to choose the parts used. * May not be able to get the repair done as quickly as you would like.If you're comfortable working on your vehicle and have the necessary tools and equipment, DIY repair can be a great option. However, if you're not comfortable working on your vehicle or if the repair is complex, it's best to take it to a professional mechanic. Remember to always prioritize safety when working on your vehicle.
:max_bytes(150000):strip_icc()/277019-baked-pork-chops-with-cream-of-mushroom-soup-DDMFS-beauty-4x3-BG-7505-5762b731cf30447d9cbbbbbf387beafa.jpg)