How to Install a Front Bumper with a Winch Mount
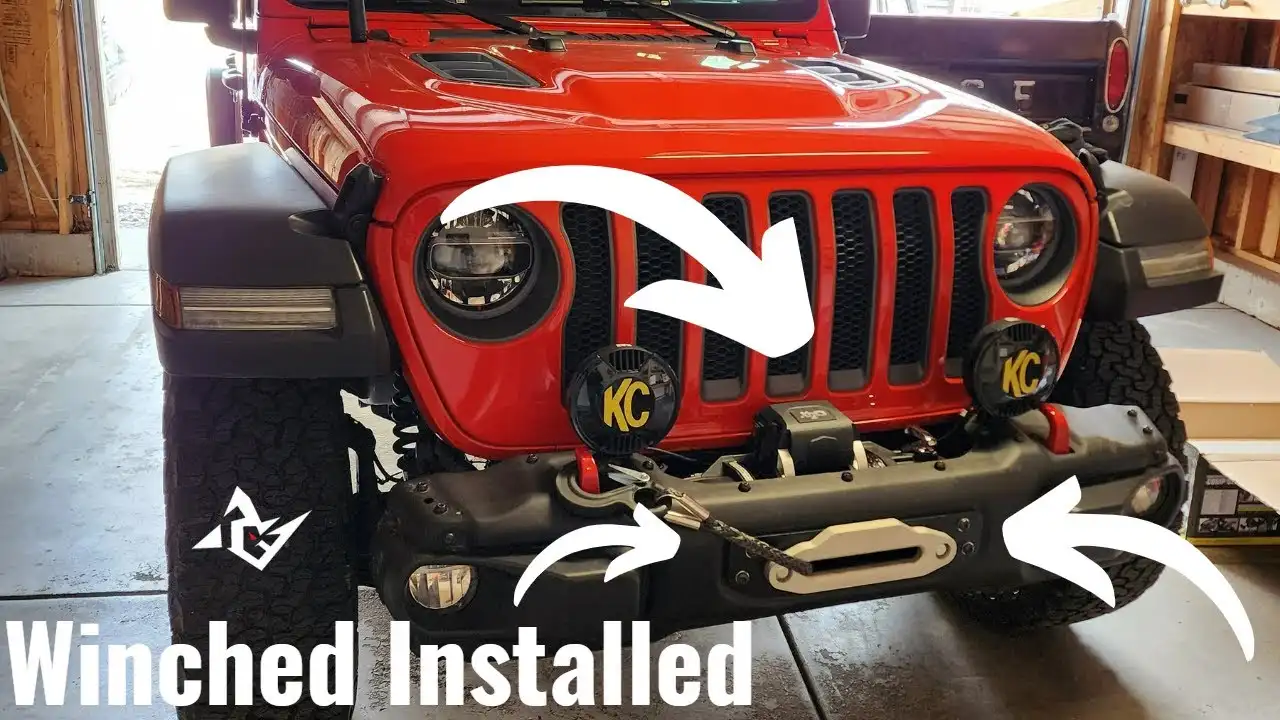
Installing a front bumper with a winch mount can significantly enhance your off-road vehicle's capabilities and appearance. It's a project that requires some mechanical know-how, but with the right tools and a step-by-step guide, you can tackle it yourself. This guide will walk you through the process, offering product recommendations, comparisons, and considerations to ensure a successful installation. This meta description is for SEO purposes, helping your article get indexed and ranked higher. We'll cover everything from choosing the right bumper to the final torque specs.
Choosing the Right Front Bumper with Winch Mount: Off Road Bumper Selection Guide
Before you even think about turning a wrench, you need to select the right front bumper. There's a massive range of options available, each with its own pros and cons. Here's what to consider:
- Material: Steel is the most common choice due to its strength and affordability. Aluminum is lighter but more expensive. Consider the type of off-roading you'll be doing. For heavy rock crawling, steel is generally preferred.
- Winch Compatibility: Ensure the bumper is specifically designed to accommodate a winch. Check the winch's weight capacity and mounting pattern.
- Style: Do you want a full-width bumper, a stubby bumper, or something in between? Full-width bumpers offer the most protection, while stubby bumpers improve approach angles.
- Features: Some bumpers include integrated light mounts, D-ring mounts, and even brush guards. Think about what accessories you plan to add.
- Price: Bumpers can range from a few hundred dollars to well over a thousand. Set a budget and stick to it.
Product Recommendations:
- Smittybilt XRC Gen2 Front Bumper: A popular and affordable steel bumper with a winch mount. Around $500.
- ARB Deluxe Bull Bar: A premium steel bumper known for its durability and extensive features. Price ranges from $1200-$1500.
- Fab Fours Matrix Series Front Bumper: A stylish and aggressive steel bumper with integrated light mounts and winch compatibility. Price around $1800.
Tools You'll Need: Essential Tools for Bumper Installation
Having the right tools is crucial for a smooth installation. Here's a list of essentials:
- Socket Set: Metric sockets are essential. A variety of sizes will be needed.
- Wrenches: Open-end and box-end wrenches in various metric sizes.
- Torque Wrench: Crucial for tightening bolts to the correct specifications.
- Impact Wrench (Optional): Speeds up the removal of stubborn bolts.
- Pry Bar: Helpful for aligning the bumper during installation.
- Floor Jack and Jack Stands: To safely lift and support your vehicle.
- Measuring Tape: For accurate measurements during alignment.
- Safety Glasses and Gloves: Always prioritize safety.
- Penetrating Oil: To loosen rusted bolts. WD-40 Specialist Penetrant is a good option.
- Drill with Metal Drill Bits (Optional): May be needed for minor modifications.
Step-by-Step Installation Guide: Installing Your Off Road Bumper
Now, let's get to the installation. This guide assumes you're replacing your factory bumper with an aftermarket bumper that includes a winch mount. Always refer to your specific bumper's instructions, as variations may exist.
- Preparation: Park your vehicle on a level surface, engage the parking brake, and disconnect the negative battery terminal.
- Remove the Factory Bumper: Locate and remove the bolts securing the factory bumper to the frame. These can be stubborn, so use penetrating oil if needed. A helper is useful for supporting the bumper as you remove the final bolts.
- Disconnect Wiring (If Applicable): If your factory bumper has fog lights or other electrical components, carefully disconnect the wiring harnesses. Label the wires to ensure proper reconnection later.
- Prepare the New Bumper: If necessary, assemble any components of the new bumper, such as light mounts or D-ring mounts. Install the winch onto the bumper according to the winch manufacturer's instructions.
- Mount the Bumper: Carefully lift the new bumper into position, aligning it with the frame mounting points. Use a floor jack to help support the bumper if needed.
- Install Mounting Bolts: Insert the mounting bolts and tighten them by hand. Ensure the bumper is properly aligned before fully tightening the bolts. Use a pry bar to make minor adjustments if necessary.
- Torque the Bolts: Using a torque wrench, tighten the mounting bolts to the manufacturer's specified torque. This is crucial for ensuring the bumper is securely attached.
- Reconnect Wiring: Reconnect any wiring harnesses that were disconnected earlier. Ensure the connections are secure.
- Install Accessories: Install any accessories, such as fog lights or light bars, according to their respective instructions.
- Test the Winch (If Applicable): Before heading off-road, test the winch to ensure it is functioning properly. Spool the winch line in and out several times.
- Final Inspection: Double-check all bolts and connections to ensure everything is secure. Reconnect the negative battery terminal.
Winch Selection and Installation: Choosing the Right Winch for Your Bumper
Choosing the right winch is just as important as choosing the right bumper. Here's what to consider:
- Capacity: A general rule of thumb is to choose a winch with a pulling capacity of at least 1.5 times your vehicle's gross vehicle weight rating (GVWR).
- Rope Type: Synthetic rope is lighter and safer than steel cable.
- Motor Type: Series-wound motors are more powerful but less efficient than permanent magnet motors.
- Remote Control: Wired and wireless remote controls are available. Wireless remotes offer more freedom of movement.
- Brand Reputation: Stick with reputable brands known for their reliability.
Product Recommendations:
- Warn VR EVO 10-S: A popular and reliable winch with a 10,000-pound pulling capacity and synthetic rope. Price around $700.
- Smittybilt X2O COMP Series Winch: An affordable winch with a 10,000-pound pulling capacity and synthetic rope. Price around $500.
- Superwinch Tiger Shark 9500: A durable winch with a 9,500-pound pulling capacity and steel cable. Price around $400.
Winch Installation Tips:
- Follow the Manufacturer's Instructions: Each winch is different, so carefully follow the manufacturer's instructions.
- Use the Correct Wiring: Use the correct gauge wiring to ensure proper power delivery.
- Secure the Winch to the Bumper: Use all of the provided mounting bolts and tighten them to the specified torque.
- Test the Winch Before Use: Always test the winch before heading off-road.
Wiring and Electrical Considerations: Connecting Lights and Accessories
Many aftermarket bumpers have provisions for auxiliary lights. Wiring these lights correctly is essential for safety and proper functionality.
- Use a Relay: Use a relay to protect your vehicle's electrical system from overload.
- Use Fused Wiring: Use fused wiring to protect against short circuits.
- Proper Grounding: Ensure all electrical components are properly grounded.
- Waterproof Connections: Use waterproof connectors to protect against corrosion.
Product Comparison: Smittybilt vs ARB Bumpers
Let's compare two popular bumper brands: Smittybilt and ARB.
- Smittybilt: Known for affordability and value. Their bumpers offer good protection and features at a reasonable price. Ideal for budget-conscious off-roaders.
- ARB: A premium brand known for its durability and extensive features. ARB bumpers are typically more expensive but offer superior protection and longevity. Ideal for serious off-roaders who demand the best.
Example Comparison:
| Feature | Smittybilt XRC Gen2 | ARB Deluxe Bull Bar |
|---|---|---|
| Material | Steel | Steel |
| Winch Compatibility | Yes | Yes |
| Light Mounts | Yes | Yes |
| D-Ring Mounts | Yes | Yes |
| Price (Approximate) | $500 | $1200-$1500 |
| Overall Durability | Good | Excellent |
Safety Precautions: Ensuring a Safe Bumper Installation
Safety should always be your top priority. Here are some essential safety precautions:
- Wear Safety Glasses and Gloves: Protect your eyes and hands from injury.
- Use Jack Stands: Never work under a vehicle supported only by a jack.
- Disconnect the Battery: Prevent electrical shocks by disconnecting the negative battery terminal.
- Use a Torque Wrench: Ensure bolts are tightened to the correct specifications.
- Have a Helper: Lifting and aligning the bumper can be difficult, so having a helper is recommended.
Maintaining Your New Bumper: Keeping Your Bumper in Good Condition
Proper maintenance will help keep your bumper looking good and functioning properly for years to come.
- Regular Cleaning: Wash your bumper regularly with soap and water to remove dirt and grime.
- Touch-Up Paint: Repair any scratches or chips in the paint to prevent rust.
- Inspect for Damage: Regularly inspect your bumper for signs of damage, such as dents or cracks.
- Tighten Bolts: Periodically check the mounting bolts and tighten them if necessary.
:max_bytes(150000):strip_icc()/277019-baked-pork-chops-with-cream-of-mushroom-soup-DDMFS-beauty-4x3-BG-7505-5762b731cf30447d9cbbbbbf387beafa.jpg)