How to Use a Winch Safely: A Step-by-Step Guide
Installing a front bumper can improve protection and functionality Learn how to install a front bumper with a winch mount Enhance your vehicle's capabilities and appearance Customize your ride with confidence using our step-by-step guide
So, you're ready to ditch that stock bumper and upgrade to something that can actually handle the trails – and maybe even mount a winch? Awesome! Installing a front bumper, especially one with a winch mount, is a pretty straightforward process, but it's crucial to do it right for safety and functionality. This guide will walk you through the steps, offer some product recommendations, and give you the lowdown on what to expect.
Preparation: Tools and Safety Gear Needed for Bumper Installation
Before you even think about touching your vehicle, let's get prepared. Here's a list of what you'll need:
- New Front Bumper with Winch Mount: Obviously. Choose one that fits your vehicle's make and model.
- Wrench Set: Metric or standard, depending on your vehicle. Have a variety of sizes handy.
- Socket Set: Again, metric or standard, with extensions for hard-to-reach bolts.
- Torque Wrench: Absolutely essential for tightening bolts to the correct specifications.
- Screwdrivers: Both flathead and Phillips head.
- Pry Bar: For persuading stubborn parts.
- Floor Jack and Jack Stands: To safely lift and support your vehicle.
- Wheel Chocks: To prevent the vehicle from rolling.
- Safety Glasses: Protect your eyes from debris.
- Gloves: Protect your hands.
- Penetrating Oil: For loosening rusted bolts. WD-40 Specialist Penetrant is a good choice.
- Measuring Tape: For aligning the bumper.
- Drill and Drill Bits: Might be needed for minor modifications.
- Wiring Tools (if installing a winch at the same time): Wire strippers, crimpers, connectors.
- Impact Wrench (Optional): Makes removing stubborn bolts much easier.
- Helper (Highly Recommended): Especially when lifting the new bumper into place.
Safety First! Make sure your vehicle is parked on a level surface, the parking brake is engaged, and the wheels are chocked. Disconnect the negative battery cable before starting any electrical work.
Step 1 Removing the Old Bumper A Detailed Guide
This is usually the easiest part, but it can still be a pain if your old bumper is rusty or damaged.
- Locate the Bumper Mounting Bolts: These are usually located on the frame rails, behind the bumper.
- Spray with Penetrating Oil: Generously spray the bolts with penetrating oil and let it soak for at least 15 minutes. This will make them much easier to remove.
- Remove the Bolts: Use a wrench or socket to remove the bolts. An impact wrench can be a lifesaver here. Be prepared for some resistance.
- Disconnect Any Wiring: If your old bumper has fog lights or other electrical components, disconnect the wiring harnesses carefully. Label the wires if necessary.
- Remove the Bumper: With all the bolts removed, carefully lift the bumper off the vehicle. This is where a helper comes in handy, as bumpers can be heavy.
- Inspect the Frame Rails: Check the frame rails for any damage or rust. If you find any, repair it before installing the new bumper.
Step 2 Installing the New Bumper with Winch Mount A Step-by-Step Process
Now for the fun part! This is where you get to see your new bumper take shape.
- Prepare the New Bumper: Some bumpers require assembly before installation. Follow the manufacturer's instructions carefully. This might involve attaching winch mounting plates, light brackets, or other accessories.
- Position the Bumper: With a helper, carefully lift the new bumper into place and align it with the mounting holes on the frame rails.
- Attach the Bumper: Insert the mounting bolts and tighten them loosely. Do not fully tighten them yet.
- Align the Bumper: Use a measuring tape to ensure the bumper is centered and level. Adjust as needed.
- Torque the Bolts: Once the bumper is properly aligned, torque the mounting bolts to the manufacturer's specifications. This is crucial for safety. Use a torque wrench to ensure accurate tightening.
- Connect Wiring (if applicable): If your new bumper has fog lights or other electrical components, connect the wiring harnesses. Make sure the connections are secure and properly insulated.
- Install the Winch (if applicable): If you're installing a winch, follow the manufacturer's instructions carefully. Usually, this involves bolting the winch to the winch mounting plate on the bumper. Connect the winch wiring to the battery, following the manufacturer's recommendations for wire gauge and fuse size.
Product Recommendations for Front Bumpers with Winch Mounts
Okay, so you know how to install it, but what bumper should you *actually* buy? Here are a few recommendations, covering different price points and vehicle types.
Budget-Friendly Bumper Options
- Smittybilt XRC Front Bumper: These bumpers are known for their durability and affordability. They offer good protection and a winch mount at a reasonable price point. Expect to pay around $400-$600. Great for Jeep Wranglers and some trucks.
- Rough Country Front Bumper: Rough Country offers a range of bumpers with winch mounts at various price points. Their bumpers are generally well-built and offer good value for the money. Prices typically range from $300-$500. Suitable for Jeeps and trucks like the Chevy Silverado or Ford F-150.
Mid-Range Bumper Options
- ARB Deluxe Front Bumper: ARB bumpers are known for their quality and durability. They offer excellent protection and a winch mount, as well as optional features like brush guards and fog lights. Expect to pay around $800-$1200. A solid choice for Land Cruisers, Jeeps, and trucks.
- Warn Rock Crawler Front Bumper: Warn is a trusted name in winches and bumpers. Their Rock Crawler bumpers are designed for serious off-road use and offer excellent protection and a winch mount. Prices usually range from $700-$1000. Designed primarily for Jeep Wranglers.
Premium Bumper Options
- Addictive Desert Designs (ADD) Stealth Fighter Front Bumper: These bumpers are known for their aggressive styling and high-quality construction. They offer excellent protection and a winch mount, as well as integrated LED lighting. Expect to pay around $1500-$2500. Popular on Ford Raptors and other high-performance trucks.
- CBI Offroad Fab Front Bumper: CBI bumpers are custom-built and offer exceptional quality and durability. They can be tailored to your specific needs and offer a winch mount, as well as other features like brush guards and light mounts. Prices typically start around $1200 and go up from there. A good option for various trucks and SUVs, including Toyota Tacomas and 4Runners.
Comparing Bumper Materials Steel vs Aluminum for Off-Roading
The two main materials you'll find in off-road bumpers are steel and aluminum. Here's a quick breakdown of the pros and cons of each.
Steel Bumpers
- Pros: Extremely strong and durable, more affordable.
- Cons: Heavy, prone to rust if not properly coated.
Aluminum Bumpers
- Pros: Lightweight, corrosion-resistant.
- Cons: More expensive, not as strong as steel (though still plenty strong for most applications).
For serious rock crawling where you're likely to be banging your bumper against rocks, steel is generally the better choice. For overlanding or lighter off-roading, aluminum can be a good option to save weight.
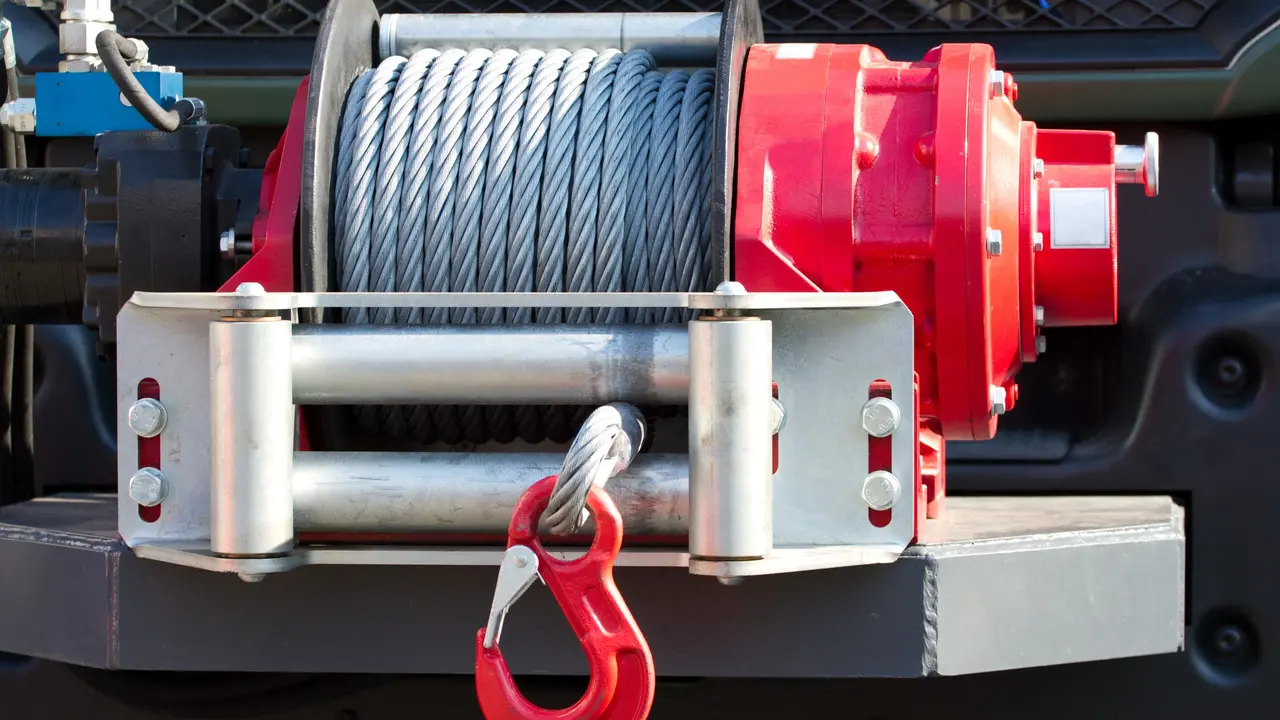
Winch Considerations Choosing the Right Winch for Your Bumper
Since you're installing a bumper with a winch mount, let's talk winches. The most important factor is the winch's pulling capacity. A good rule of thumb is to choose a winch with a pulling capacity that is at least 1.5 times your vehicle's gross vehicle weight rating (GVWR). So, if your vehicle weighs 5,000 lbs, you'll want a winch with at least a 7,500 lb pulling capacity.
Here are a few popular winch brands:
- Warn: The gold standard in winches. Known for their reliability and performance.
- Smittybilt: A more affordable option that still offers good performance.
- Superwinch: Another reputable brand with a range of winches for different applications.
Also, consider whether you want a synthetic winch rope or a steel cable. Synthetic rope is lighter and safer (it doesn't store as much energy if it breaks), but it's also more expensive. Steel cable is more durable but can be dangerous if it snaps.
Troubleshooting Common Installation Issues
Even with a detailed guide, things can still go wrong. Here are a few common issues and how to deal with them:
- Stripped Bolts: Use a bolt extractor or try heating the bolt with a torch. As a last resort, you may need to drill out the bolt.
- Misaligned Mounting Holes: Use a pry bar to gently align the bumper with the mounting holes. You may need to enlarge the holes slightly with a drill.
- Wiring Problems: Double-check your wiring connections and make sure all the wires are properly insulated. Use a multimeter to test for continuity.
- Rattling or Vibration: Make sure all the bolts are properly torqued. You may need to add shims or washers to eliminate any play.
Final Checks and Post Installation Tips
Once you've installed the bumper and winch, give everything a thorough check.
- Check Bolt Torques: Re-torque all the bolts after driving a few miles.
- Test the Winch: Make sure the winch is working properly and the rope is spooling correctly.
- Inspect Wiring: Check the wiring for any signs of damage or wear.
- Adjust Fog Lights (if applicable): Aim the fog lights properly.
And that's it! You've successfully installed a front bumper with a winch mount. Now you're ready to hit the trails with confidence.
:max_bytes(150000):strip_icc()/277019-baked-pork-chops-with-cream-of-mushroom-soup-DDMFS-beauty-4x3-BG-7505-5762b731cf30447d9cbbbbbf387beafa.jpg)